Managing Smart Routing Rules
BR-DGE Smart Rules provide you with fine grained control over your payment processing estate. Using the BR-DGE Portal you can manage your entire payments estate from a single, easy to use, UI.
For more information on BR-DGE Smart Routing, how it works, and any specific terminology, check out our Smart Routing overview before continuing with the rest of this guide.
Managing Your Rules
In the Smart Routing tab of the BR-DGE Portal users with the correct permissions can view, edit or delete your existing rules and fragments, or create new ones.
Check out each of the following sections to see the different ways to manage your rules.
- 🏗️ Creating Rules
- ✏️ Editing Rules
- 🗑️ Deleting Rules
🏗️ Creating Rules
To create a new rule navigate to the "Smart Routing" tab of the BR-DGE portal, and click the "Add Rule" button at the bottom of the current rule set. A blank rule will be inserted to the page.
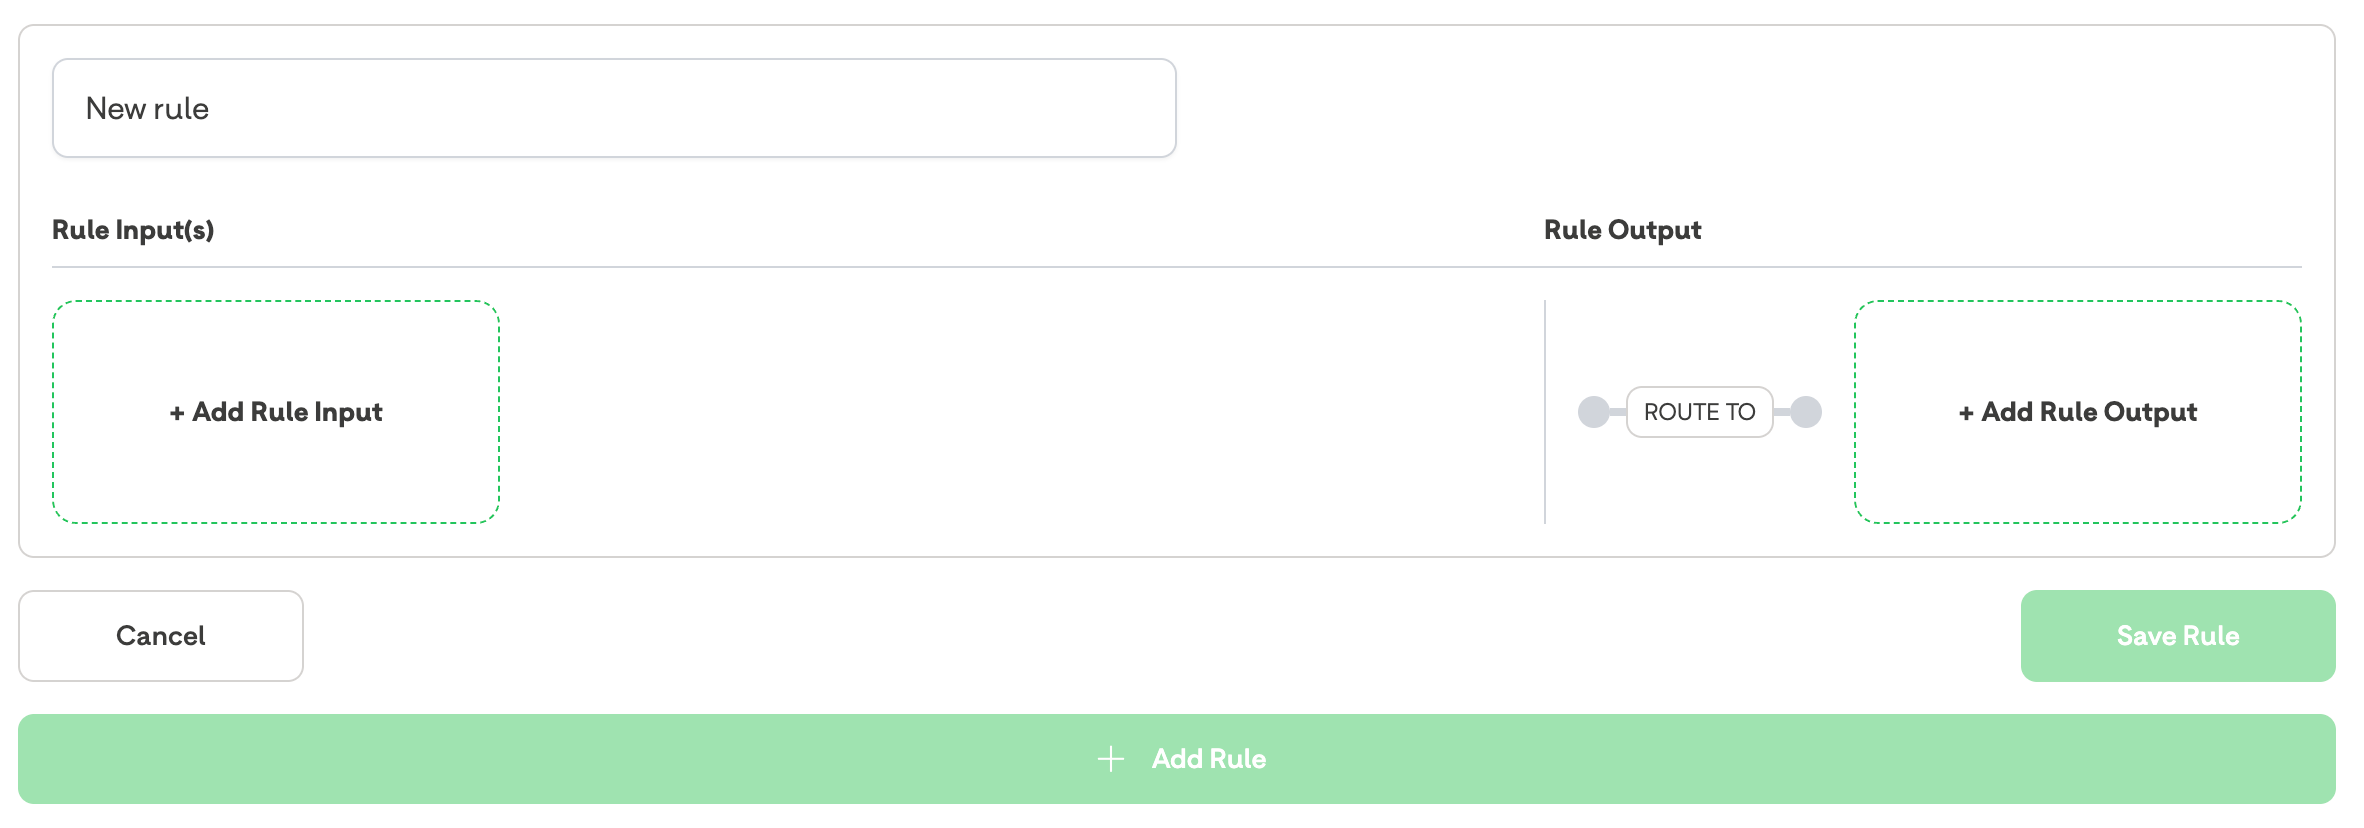
A newly created, blank, rule
By default, all newly created rules will be given the name "New rule". We highly recommend that you change this to provide a description of your soon to be created rule. Providing a good name for your rule will make future management of your rules easier.
Adding an Input Fragment
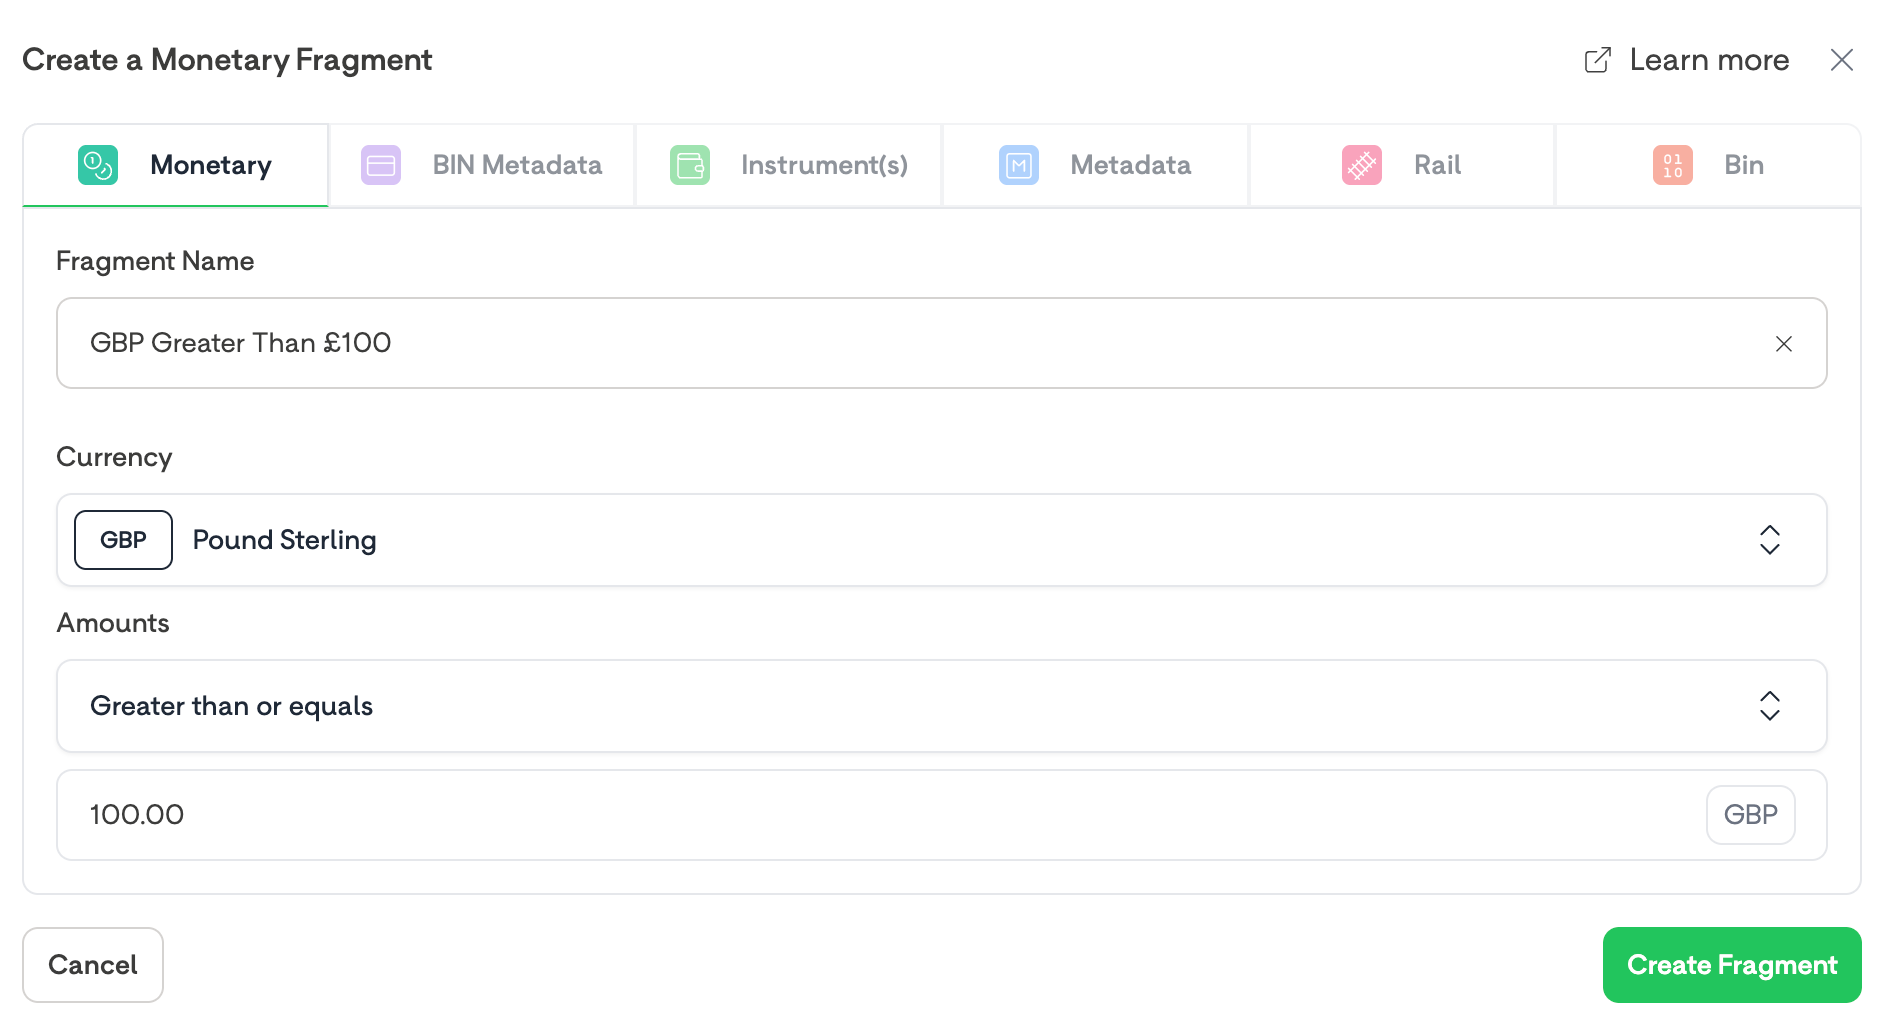
To add an input fragment to your new rule click anywhere inside the green dashed line of the "Add Rule Input" box to load the input fragment selector. Select the relevant input fragment you wish to use, you can now tailor the details of the input fragment to match your routing requirements.
In the below example we would be creating a "Monetary" Input Fragment, with the name "GBP Greater Than £100" which would match on any payments where the currency was GBP, and the amount was greater than or equal to £100.
A Monetary Input Fragment - Ready to be Created
Once you are happy with your Input Fragment, and have tailored the fragment conditions to suit your needs, click the "Create Fragment" button to generate the fragment, and insert it into your rule.
Adding an Output Fragment
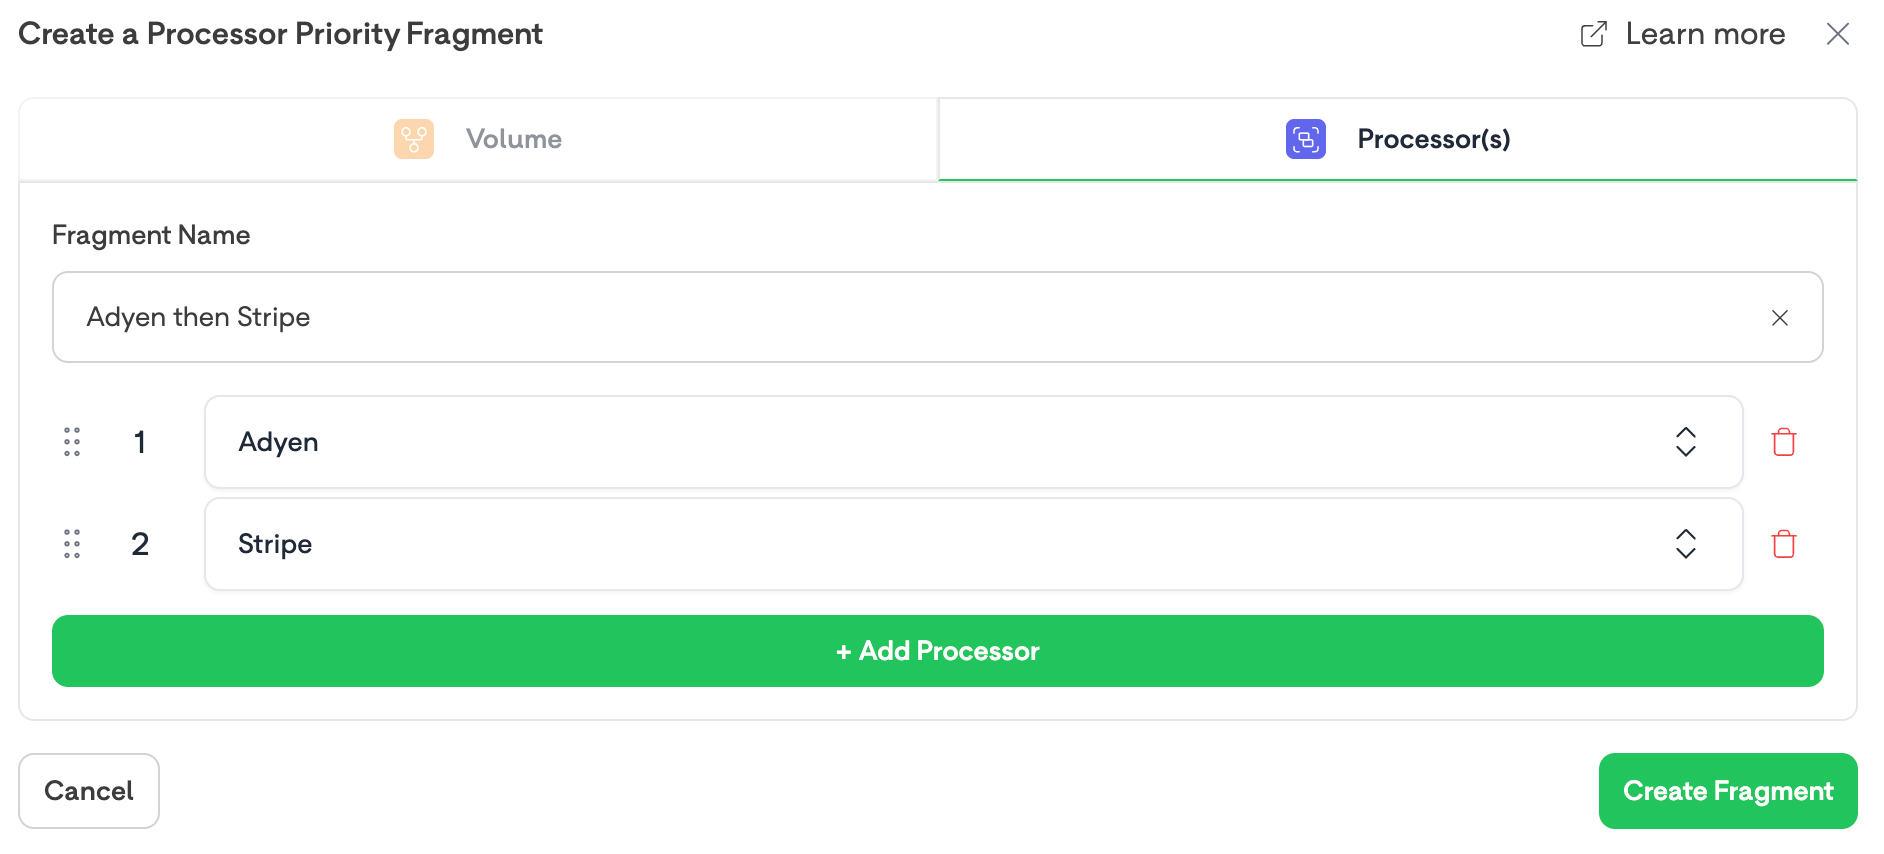
To add an output fragment to your new rule click anywhere inside the green dashed line of the "Add Rule Output" box to load the output fragment selector. Select the relevant output fragment you wish to use, you can now tailor the details of the output fragment to match your routing requirements.
In the below example we would be creating a "Processor Priority" Output Fragment, with the name "Adyen then Stripe" which would route any transactions that match our input rule fragments to Adyen, then to Stripe.
A Processor Priority Output Fragment - Ready to be Created
Once you are happy with your output fragment, and have tailored the fragment conditions to suit your needs, click the "Create Fragment" button to generate the fragment, and insert it into your rule.
You must provide an output fragment to save a rule
Saving the Rule
Once you have finished creating your new rule, you can make the rule live by clicking the "Save Rule" button at the bottom left of the rule editing screen.
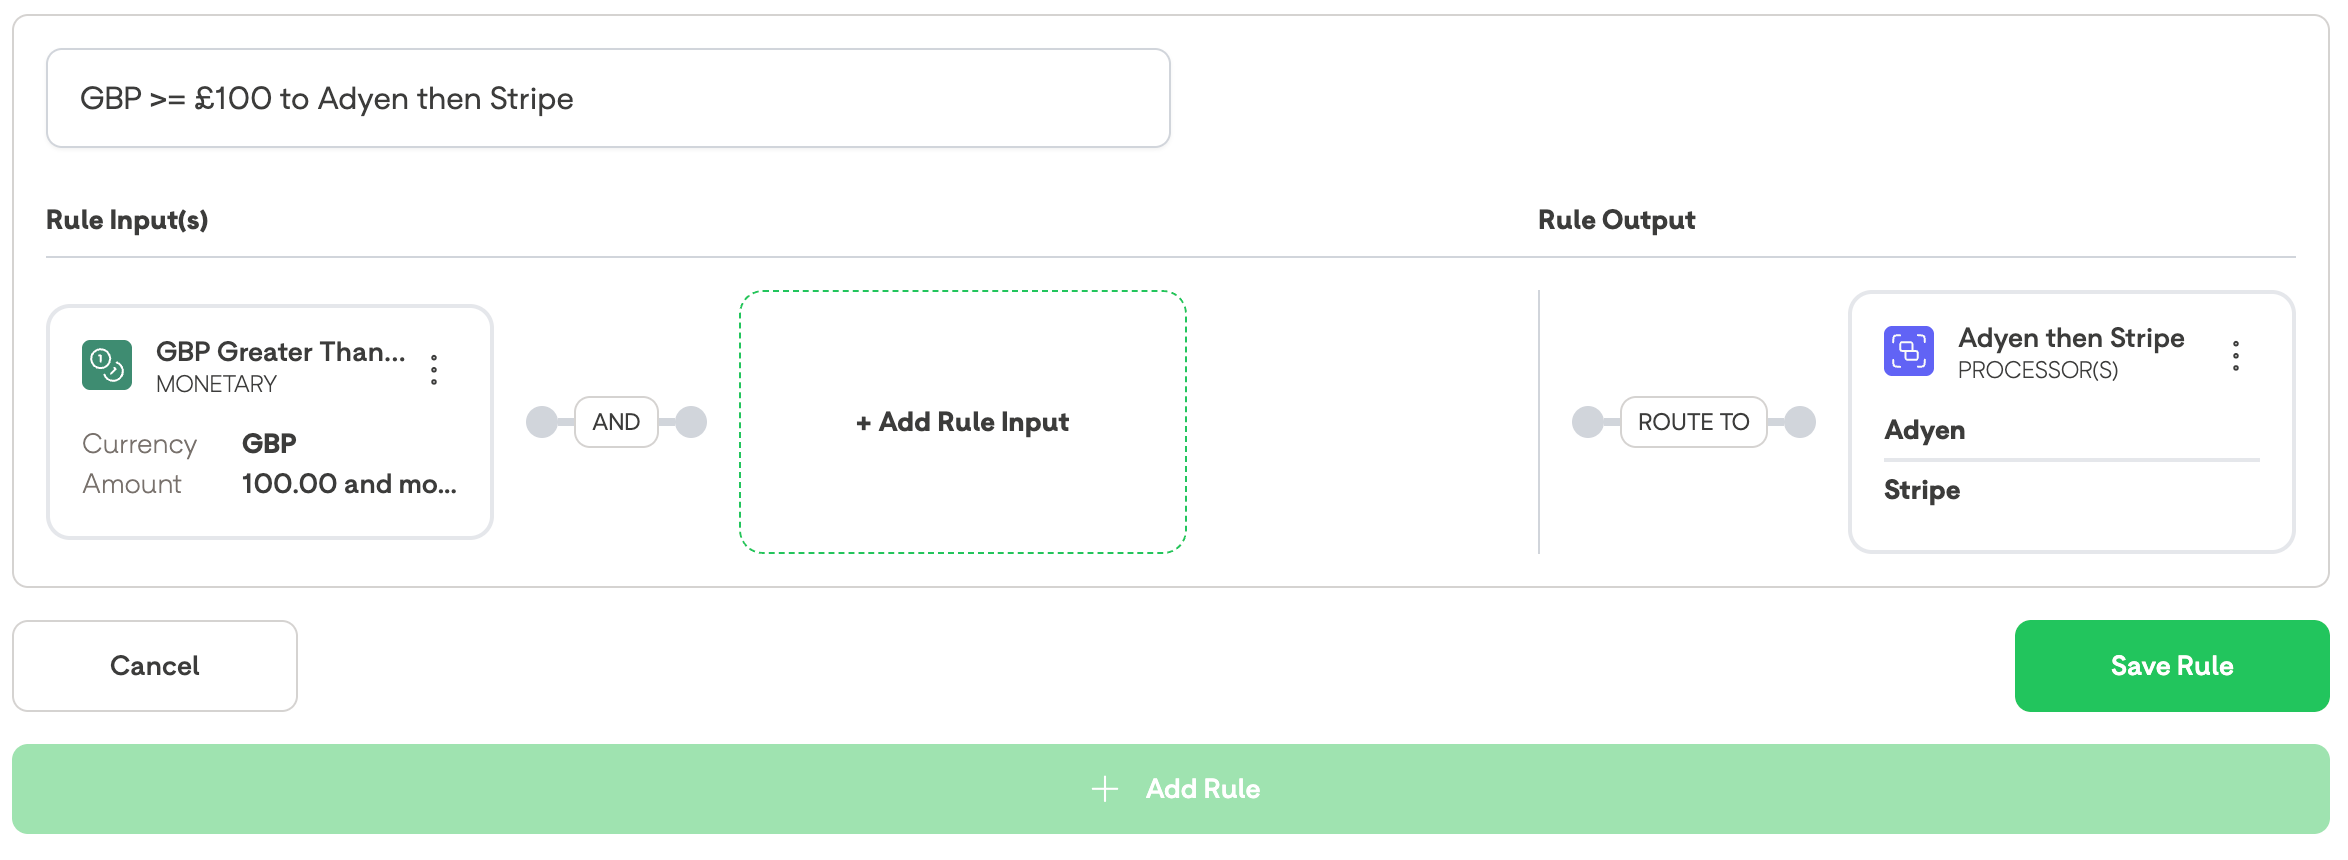
A Finalised Rule, Ready to be Saved
Once you have clicked the "Save Rule" button the new rule will be live, and ready to use.
BR-DGE Smart Rules are cached for a short period of time, so you may need to wait before a transaction starts to use the newly created rule. The rule cache will update no more than 10 minutes after the rule has been created.
✏️ Editing Rules
You can edit your BR-DGE Smart Routing Rules directly in the BR-DGE portal using the same interface you use to create them. When logged into the portal navigate to the "Smart Routing" tab, locate the rule you wish to edit, click the 3 dots at the top right of the rule, then click "Edit".

Selecting Edit Mode on an Existing Rule
In the rule edit view you can update, tweak, or fully change a rule in the same way you would if you were creating a new rule.
Editing rules can be useful in the following scenarios:
- Updating the name of an existing rule
- Adding or removing fragments
- Editing existing fragments
You cannot update the type of a fragment after it has been created. To alter a fragment type after creation first delete the original fragment, and recreate it again
To edit an existing fragment select the 3 dots at the top right of the fragment you want to edit, then click the "Edit" button.
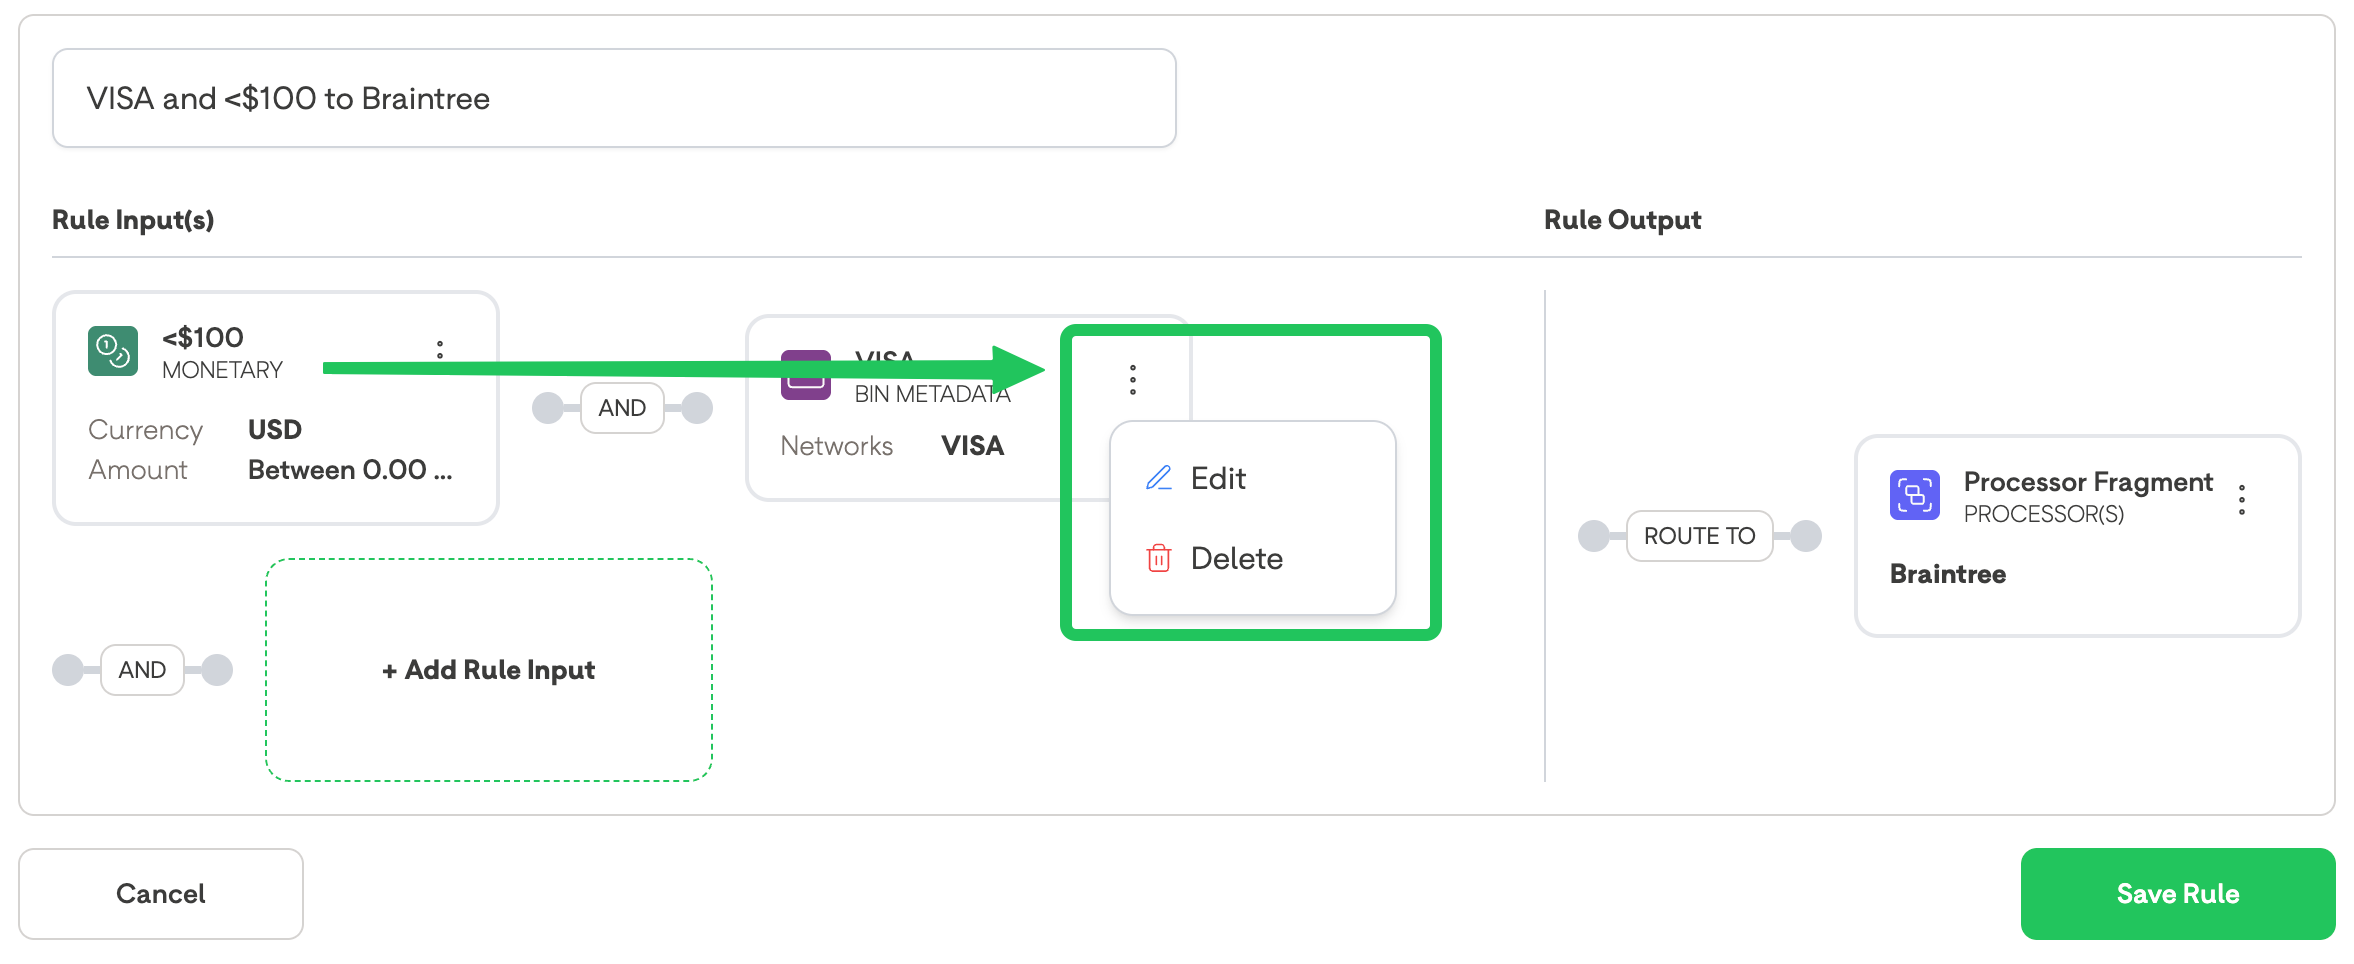
Selecting Edit Mode on an Existing Input Fragment
New input fragments can also be added to an existing rule in the edit view. To add a new input fragment, after entering the rule edit mode, follow the instructions from the "Adding an Input Fragment" section of this guide.
After you have finished editing your rule save your changes by clicking the "Save Rule" button at the bottom right of the edit view to finalise your changes.
If you no longer wish to make your staged changes you can click the "Cancel" button on the bottom left of the edit view. Cancelling your changes applies to both rules, or to fragments.
Pressing "Cancel" will discard your changes, and revert the rule, or fragment back to its original state.
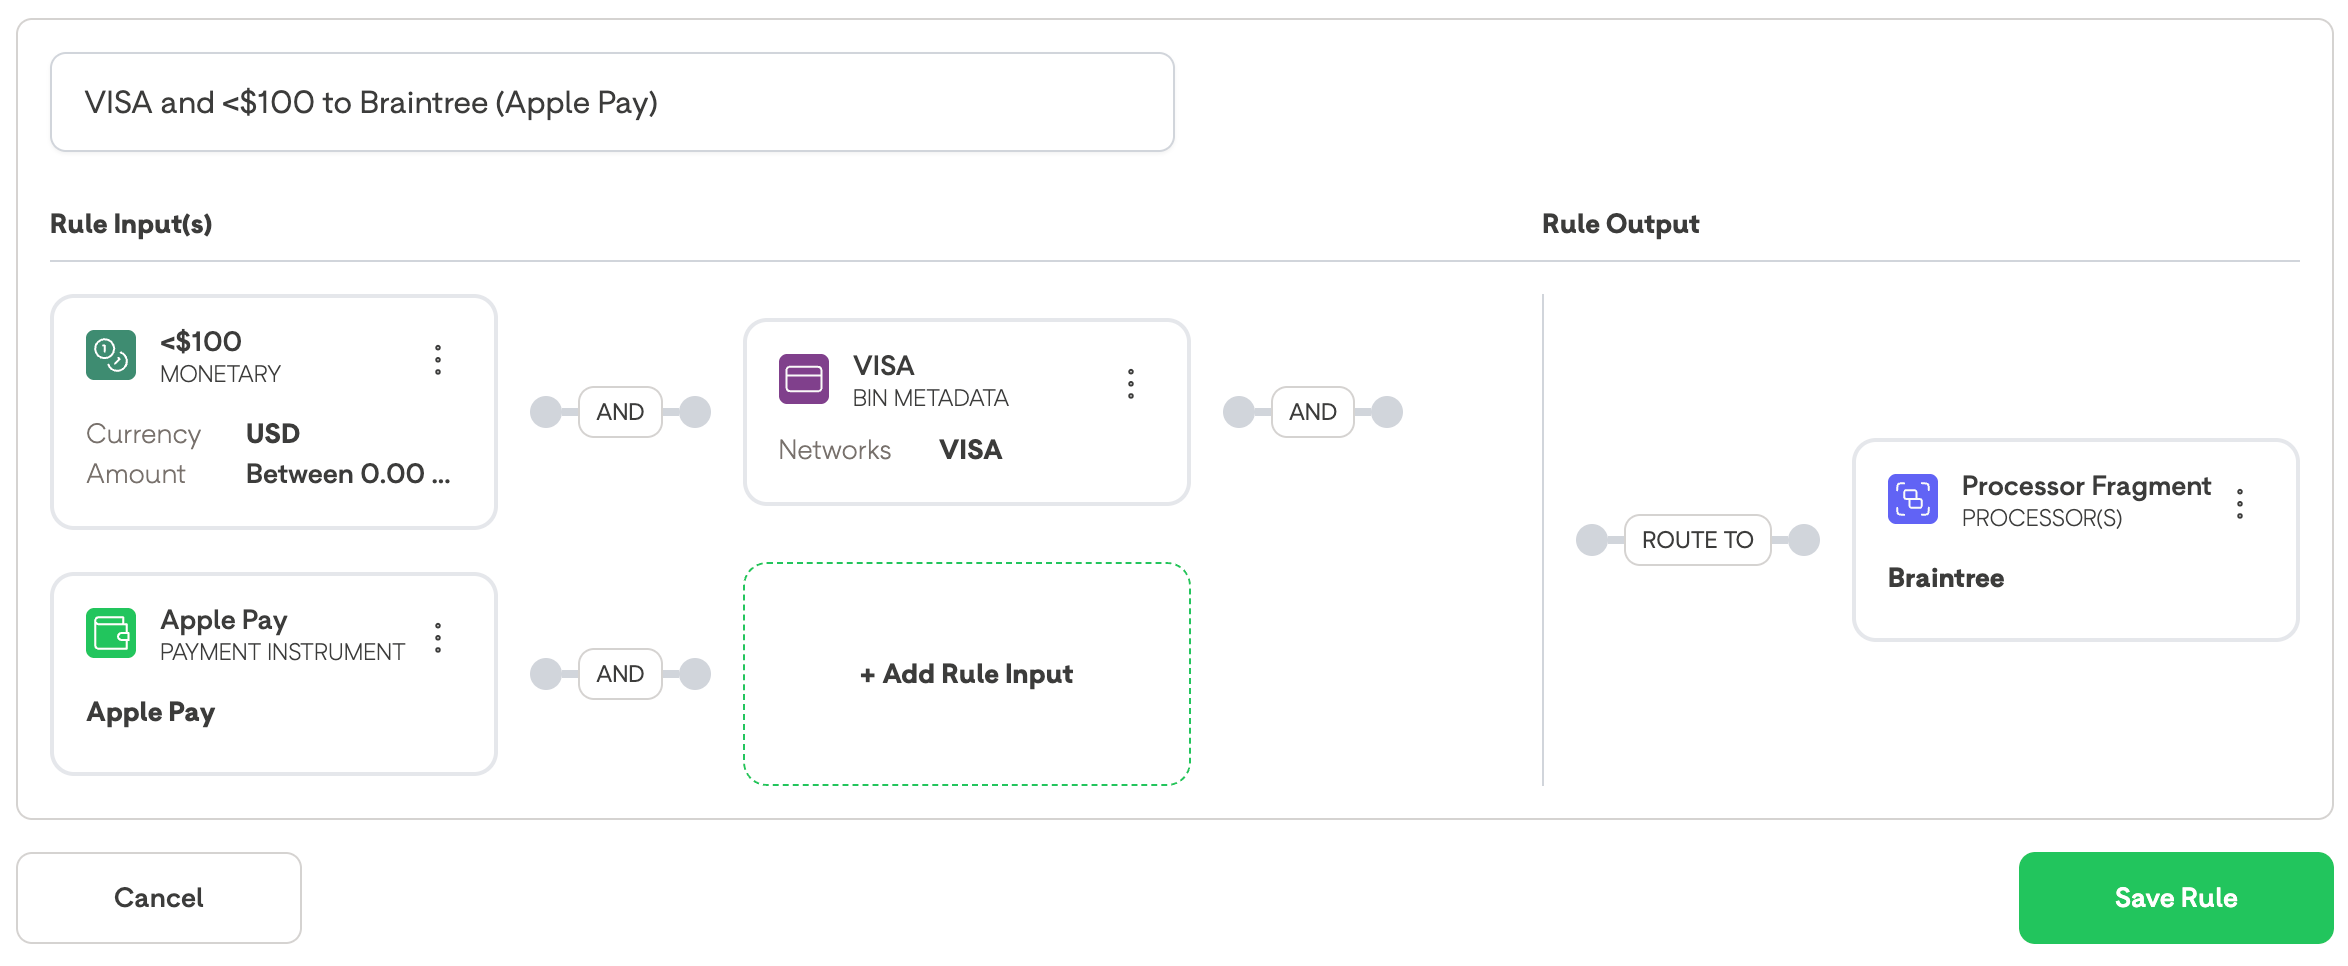
An Updated Rule, Ready to be Saved
BR-DGE Smart Rules are cached for a short period of time, so you may need to wait before a transaction starts to use the newly created rule. The rule cache will update no more than 10 minutes after the rule has been created.
🗑️ Deleting Rules
Deleting a Smart Rule is an immediate, and irreversible action. If you delete a rule in error BR-DGE cannot revert your rules to a previous state, and you will need to manually recreate them.
You can delete your existing Smart Routing Rules in the BR-DGE portal.
Once logged in to the BR-DGE Portal navigate to the "Smart Routing" tab in the left hand navigation bar, and locate the rule you wish to delete.
To delete an existing rule select the 3 dots at the top right of the fragment you want to delete, and click the "Delete" button.

You will be prompted to confirm you wish to delete this rule.
- Click "Delete" to confirm the rule deletion
- Click "Cancel" to return to the previous view.
If you select "Cancel" no changes will be made to your Smart Routing Rule, and the rule will remain active.
Support
If you require any support with managing your routing rules please get in touch with our support team.
Updated 12 days ago